Setting up SAML 2.0 with Okta for Web Client
This topic provides step-by-step instructions on how to set up SAML 2.0 in Web Client with Okta.
SAML Configuration in Okta
-
Create a developer account on the Okta website at https://developer.okta.com/signup/.
-
Click Applications on the menu.
-
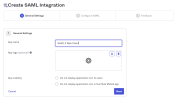
Click Create App Integration.
-
Select SAML 2.0.
-
In the App name field, enter SAML 2 Web Client.
-
Click Next.
-
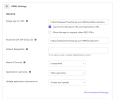
In the Single Sign on URL field, enter your Nectari URL + :port followed by /AuthServices/Acs.
-
In the Audience URI (SP Entity ID) field, enter your Nectari URL + :port followed by a Unique Identifier for your domain. The URL and the port should be the same as those entered during the Nectari installation.
-
Click Next.
-
Click Finish.
-
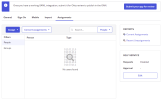
Select the Assignments tab.
-
Click Assign.
-
Add the Nectari users who will be connecting with SSO.
-
Download the Okta Certificate.
-
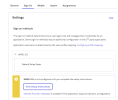
Click the Sign On tab and select View Setup Instructions.
-
Take note of the Single Sign-On URL and Identity Provider Issuer (Entity ID).
Web Client Configuration
Copying the Okta Certificate
-
Add the Okta certificate into the AppData folder (under inetpub).
-
Open the web.config file.
-
Set the following application settings.
<add key="ssoMode" value="saml2"/> <add key="ssoNameAttribute" value="http://schemas.xmlsoap.org/ws/2005/05/identity/claims/nameidentifier"/> -
Update the
sustainsys.saml2parameters as follows.<sustainsys.saml2 entityId="https://releaser11.nectariqa.com:444/biwebclient" returnUrl="https://releaser11.nectariqa.com:444/" modulePath="/AuthServices"> <identityProviders> <add entityId="http://www.okta.com/exk3u462dqPKu2LAk5d7" signOnUrl="https://dev-40198417.okta.com/app/dev-40198417_saml2_1/exk3u462dqPKu2LAk5d7/sso/saml" allowUnsolicitedAuthnResponse="true" binding="HttpRedirect"> <signingCertificate fileName="~/App_Data/okta.cert"/> </add> </identityProviders> </sustainsys.saml2> <system.identityModel.services> <federationConfiguration> <cookieHandler requireSsl="true" name="BIWebClient"/> </federationConfiguration> </system.identityModel.services> -
Restart the Web Client.
Creating Users and Groups in Nectari
-
Refer to Users to create your Web Client user by entering the same value for User Name and SAML2 answer's Attribute for user name you defined during the installation of the package.


